@Breadventures_NJ
  • Home
  • Blog
  • Recipe Index
  • Forum
  • Contact

CHOCOLATE CHIP BISCOTTI

10/12/2014

1 Comment

 
      This recipe is a great introduction to the huge range of possibilities for biscotti/cantucci. You can put almost any (dry) ingredient in these, but I chose mini semi-sweet chocolate chip morsels. 'Biscotti' means twice-cooked in Italian, and that is exactly how you accomplish this dessert. Mix the dough and roll into logs. Space the logs with enough room to spread on a baking sheet. Then bake the logs, slice into the typical cantucci shapes, lay them in a pan, and cook for a second time! These are great with coffee, milk, dessert wine (vin santo, traditionally Tuscan), and other things I probably haven't discovered yet. They also preserve for quite a bit of time. The perfect dessert.
Yield: approximately 50 medium biscotti

Ingredients:
3 large eggs
3.5 cups all-purpose flour
1 cup (2 sticks) butter, melted + 1/2 cup olive oil
1 cup sugar
1 Tsp vanilla extract
1 Tsp baking powder
1 Tsp salt
1-1.5 cups mini chocolate chips (your preference, I used semi-sweet and 1 cup)
Coarse sugar for sprinkling (optional)

Directions:

1) By hand (vigorously) or machine, beat together the eggs, butter + oil, sugar, vanilla extract, and salt at medium speed until thickened, about 5 minutes. Then add the flour and baking powder and stir vigorously.

2) Next, mix in the chocolate chips and nuts. Cover and refrigerate for 2-3 hours (or overnight).

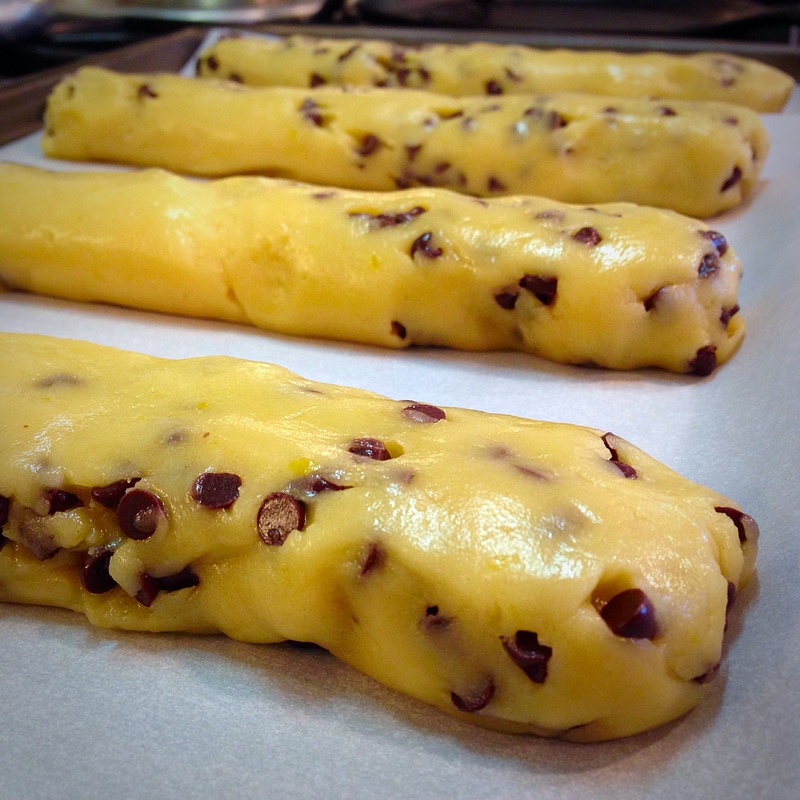
3) Preheat the oven to 350°F. Lightly grease TWO baking sheets
(or line with parchment). Divide the dough into four even pieces. Shape each piece into a log, to form four even logs, about an 10" x 2" log. Place 2 logs on each greased (or parchment lined) baking sheet, leaving at least 2" between them--they WILL spread out. If they do touch in the oven, it's not a major problem...you can cut them apart easily. But try to avoid it if you can.

4) Sprinkle the shiny, buttery logs with coarse white sugar, as desired.

5) Bake the logs for about 30 minutes in the oven, until they solidify a bit and begin to brown and the edges and sides ONLY. You don't want them brown all over at this point. Remove them from the oven, and reduce the oven temperature to 300°F. Allow them to cool for 10 minutes.

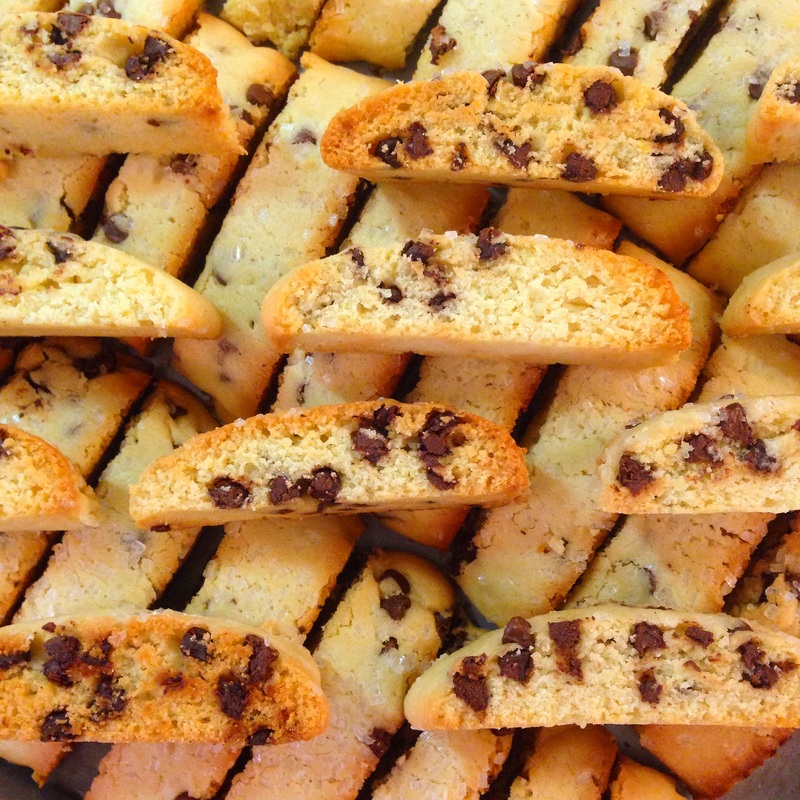
6) Cut each log into 1/2" to 3/4" slices. Cutting them on a diagonal will make them longer. If you want shorter cookies, you can cut them straight across to yield shorter cookies.

7) Place the pieces close together (on edge) on the baking sheets, and return them to the oven for an additional 35 to 45 minutes, until you see more browning around the edges. The point is simply to bake them all the way through.

8) Remove from the oven, and cool the biscotti on the baking sheets.

1 Comment

APPLE CINNAMON DESSERT LOAF

10/12/2014

0 Comments

 
     This was my first attempt at a yeasted pastry loaf that is not brioche. I searched among a number of recipes for ideas and found this solution--a yeasted bread that tastes great and looks impressive, but is not at all difficult to accomplish. The key is to keep the apples in the center 1/3 of the dough once it is rolled out, and to make sure the apple stuffing does not have too much liquid (you can save excess liquid for the glaze). The apples should not be sliced/prepared until the dough is ready to be rolled, otherwise they will oxidize (brown). This loaf cooks nicely and each slice displays a golden core of apples. This yields one rather large loaf.
Yield: 1 large Apple loaf (serves 8-10)

Ingredients:
For the dough:
2 1/2 cups all-purpose flour
2 Tbsp warm water
2 1/4 instant yeast
1/4 Tsp sugar (for yeast activation)
1/2 cup whole milk
6 Tbsp sugar
5 Tbsp unsalted butter, cut in chunks
1 Tsp salt
2 egg yolks

For apple stuffing:
3-4 medium sized golden delicious apples (or Granny smith--the idea is low water content)--skin peeled, cored, cut into 0.5cm slices
1/2 cup brown sugar
1 Tsp of lemon juice (to prevent apples from browning)
1/3 cup cookie crumbs (lady fingers, vanilla, or butter cookies)
1 1/2 Tsp cinnamon (or cinnamon sugar)
1 whole egg, beaten (for eggwash)

For glaze:
If you have juice left over from simmering the apples, you can add Confectioner's sugar to this until it thickens, and use this as a glaze!
Alternatively, whisk the following ingredients together in a bowl:
1 cup powdered sugar
1 Tbsp + 2 Tsp whole milk
1/4 Tsp vanilla extract
1/4 Tsp kosher salt

Directions:
For the dough:
1) Place 2 tbsp of warm water and the 1/4 Tsp sugar in a small bowl. Stir in the yeast and let stand in a warm place until the mixture foams, about 10-15 minutes.

2) Stir the milk, sugar, butter chunks, and salt in a medium pot over medium heat until the sugar dissolves and the butter melts (mixture should be warm, not hot).

3) Transfer this warm butter mixture into a medium/large bowl. Then whisk in the yeast mixture, and egg yolks. Add the flour, stirring with a wooden spoon until the dough comes together. You can knead the dough with a hook (mixer) for 6 minutes, OR if you don’t have a mixer you can knead by hand for about 8-10 minutes.

4) Transfer dough to a clean (large) bowl lightly sprayed with oil. Cover with oiled plastic wrap and let rise until almost doubled, about 1.5-2hrs (for this step, I often preheat my oven to 200F just for a moment, then I turn if off for a few minutes and place my dough bowl in there with the oven light on. It works very well.

5) Let the dough rise until almost doubled in volume, about 1 ½-2 hrs. Gently punch the dough down in the bowl and let the dough rest in the bowl on the counter for about 45-60min while you work on the filling.

For the filling:

6) Peel and slice the apples and toss in the lemon juice (to prevent browning). Melt the butter in a medium pot over the medium heat. Add the brown sugar and cinnamon. Cook until a grainy sauce forms, about 1 minute. Mix in the apple slices. Cook until the apples are tender and the sauce is reduced to glaze, about 7-10 minutes, stirring often to avoid scorching. Cool the filling for least 30 minutes and. Set the apple stuffing aside and return to the dough!

7) Place a large sheet of aluminum foil on a work surface. Spray with nonstick spray and lightly dust with flour. Turn the dough out onto the foil and roll out to 14×12-inch (30x35-cm) rectangle. Sprinkle the cookie crumbs lengthwise (in the longer, 14inch or 35cm direction) in the middle 1/3 of the rectangle leaving ½ inch (about 1.5cm) border at the top and bottom of the rectangle.

8) Arrange the apples with any juices over the crumbs. Starting ½ inch (1.5cm) from the each long side of the apple filling, cut the dough at a slight diagonal to the top edge of the rectangle at 1-inch (2.5cm) interval, making about 12-13 strips on each side. See pictures above for reference. Fold the dough strips alternately, left then right, and on a slight angle over the filling. This forms the lattice. Seal the open ends of the dough. You should not be able to see an escape route for apples!

9) Slide the loaf (keep it on the foil) onto a large baking sheet. Roll the sides of the foil up a bit to contain juices if your lattice leaks--if you braided it without gaps, you should be fine!). Cover the loaf loosely with oil-sprayed plastic and let the dough rise in the warm place until light and puffy, about 30-60min.

10) Preheat the oven to 375F. Gently brush the loaf with the egg wash. This will especially help to seal the braid. Bake until golden brown, about 25-30 minutes. Let cool on foil over wire rack for 30 minutes. When cool, use a spatula to gently separate the loaf from the aluminum and transfer to a large serving dish.

11) At this point you can add the glaze and sift Confectioner's sugar over the top as desired:

For the glaze:
If you have juice left over from simmering the apples, you can add Confectioner's sugar and stir until it thickens. You can use this as a glaze or a sauce to drizzle over your slices. Alternatively, whisk the above-listed ingredients together in a bowl.

Serve the cake slightly warm or at room temperature.

NOTE: Due to lack of preservatives in the dough, the loaf tastes the best within the first few hours or days of baking. I would recommend freezing the loaf you plan to eat it more than 2-3 days after baking, as it will rapidly become stale.
0 Comments

STUFFED FLAT BREADS

10/5/2014

1 Comment

 
     This flat bread was nice and soft, great for dipping in anything, and had great flavor inside and out. It's not difficult to make and the results are great! You can do this stove-top or on a grill (but keep your eye on them at all times). And you can choose whatever stuffing you want to put in the middle--herbs, meats, etc. However don't over-stuff them, because optimally you don't want the inside contents leaking out onto your grill/grittle.
Yield: 4 medium/large stuffed flat breads

Ingredients:
For dough:
5-6 cups all-purpose flour
1/2 cup olive oil
1 Tsp honey
2 Tsp instant yeast
2 1/2 Tsp salt
3/4 cup yogurt, plain
Additional olive oil for brushing

For mushroom stuffing:
8oz package of mushrooms (of your choice)
1 Tbsp butter
1 Tbsp fresh scallions, sliced

Directions:
1) In a medium bowl, mix 2 cups of water, honey and yeast. Let sit for about 10 minutes. Then add salt, yogurt, and 1 Tbsp oil, and stir together.

2) Add flour to wet mixture starting with 2 cups, and gradually adding more until the dough becomes stiff.

3) Transfer dough to lightly floured surface and knead until smooth and silky, about 5 minutes. Dough should still be a little sticky.

4) Place dough in a lightly greased medium-large bowl and cover with plastic wrap. Let rest in a warm area about 2 hours, or until doubled.

5) Now prepare the mushroom filling (you can do what you want! But this is what I did for my recipe): rinse mushrooms under water and wipe dry. Cut off the hard tip of the stem and slice them lengthwise. Then melt about 1 Tbsp butter in a skillet until the foam dissipates. Then drop the mushrooms into the skillet and add chives and salt and pepper to taste. The mushrooms will absorb the liquid first, then they will release it. Sautee for 1-2 minutes after this. Then set aside to cool.

6) Divide dough into 4 equal portions and chill for about 20 minutes in the refrigerator. Next, on a lightly floured surface, roll out each portion into a rough circle/oval, about 8 inches in diameter (you may need additional flour to make sure your rolling pin and dough don't stick to each other--but only add as much as you need! Not more!).

7) Brush top of each flattened round with olive oil, and add the stuffing of your choice (again, here I did sauteed mushrooms and herbs) to the center of each round. Then, fold the edges of the dough onto each other in the center to cover your stuffing--press and seal (with your hands or the rolling pin) so that your stuffing is no longer visible and tucked into your dough. Now you should have a stuffed round that you have made flat.

8) Heat up a medium/large skillet over medium heat on your stove top (you can also do these on the grill). Brush both sides of the stuffed dough rounds with olive oil. Then place one round at a time on your skillet. Once the bread begins to puff/bubble/brown, it's time to flip it over (about 2min) to the other side. After you have grilled the flat bread on both sides, transfer to cooling rack and sprinkle with salt.

NOTE: Due to lack of preservatives in the dough, the breads taste the best within the first few hours of baking. I would recommend freezing them if you plan to eat them more than one day after baking, as they will rapidly become stale.

1 Comment

SOFT GOLDEN FOCACCIA

10/2/2014

0 Comments

 
     This was my first attempt at focaccia in a really long time, and I have to say it worked out beautifully. That 1 cup of semolina goes a long way. It's just the right amount to not dry out the dough, but still give it that characteristic golden hue. And for those who know and love the taste of semolina, you will certainly notice that flavor in this bread! If you don't know the taste of semolina, you'll at least notice this bread has a well-rounded, balanced taste. As long as you grease the pan and watch it when it bakes (don't burn the top!), this particular focaccia recipe seems to be pretty forgiving and will lead you to a pleasing result. I plan to make it again.
Yield: 1 large focaccia (the above pictures show a doubled recipe)

Ingredients:
3 - 3 1/2 cups all-purpose flour
1 cup semolina (not semolina flour)
1 1/2 cups water
2 1/4 teaspoons instant yeast
2 1/2 teaspoons baking powder
1 1/4 teaspoons salt
2 tablespoons olive oil

For baking:
An additional 1 Tbsp olive oil for greasing pan

Directions:
1) Place all of the ingredients--except the salt--in a medium-large bowl (or mixer if you prefer). Mix until ropes begin to form in the dough. Then add the salt. The dough will be a little sticky.

2) Transfer the dough to a lightly floured counter space and knead to form a smooth (sticky) dough. Lightly grease the medium/large bowl. Place dough in bowl and cover with plastic wrap. Let rise in warm/room-temperature area for 1-1.5hrs, until doubled in bulk

3) Lightly oil a medium/large pan (anything in the vicinity of a 12" round pan or 9 x 13-inch rectangular pan). Place the dough in the pan, and gently push (to stretch) it to fill and touch all the walls of the pan. If the dough resists you too much, let it rest for 10-15 minutes and try again.

4) Cover the pan with plastic wrap and let the dough to rise for about 30 minutes. The dough will puff a bit. If you want a more airy focaccia, let it rise a little longer.

5) Preheat the oven to 425°F. Gently brush some olive oil on top of the dough (don't be too fierce or you will deflate the dough!). Use your finger tips to dimple the whole surface of the dough gently. Sprinkle with coarse salt and pepper, dry herbs, fresh herbs, olives, cherry tomatoes, sun dried tomatoes...whatever you want!

6) Bake the bread for about 20 to 30 minutes, until it’s golden brown--keep an eye on it!

7) After about 5 minutes, transfer to wire rack for cooling.


NOTE: Due to lack of preservatives in the dough, the bread tastes best within the first few hours of baking. I would recommend freezing it if you plan to eat it more than one day after baking, as it will rapidly become stale.
0 Comments

    Author

    Female.
    Amateur.
    Italian-American.
    New Jersey.
    USA.

    Categories

    All
    Bread
    Breakfast
    Brioche
    Cheese
    Crusty Bread
    Dessert
    Flat Breads
    French + Italian
    Pasta
    Pizza
    Pretzel
    Sauces/Dips
    Stuffed Breads

    Archives

    January 2015
    December 2014
    October 2014
    September 2014
    August 2014

    RSS Feed

    Instagram
Powered by Create your own unique website with customizable templates.